Solution
To resolve this issue on mobile devices, perform the following steps.
For Microsoft IIS 5.0, 6.0 and 7.0
Step 1: Obtain GeoTrust Cross Root CA and GeoTrust Intermediate CA
Step 2: Adding the Certificates Snap-in to the Microsoft Management Console (MMC):
Microsoft IIS 5.0 or 6.0
- From your Web server, go to Start > Run
- Enter mmc in the text box
- Click OK
- From the Microsoft Management Console (MMC) menu bar, select Console >Add/Remove Snap-in
- Click Add
- Select Certificates from the list of snap-ins
- Click Add
- Select the Computer account option
- Click Next
- Select the Local computer(the computer this console is running on) option
- Click Finish
- Click on the Close button on the snap-in list window
- Click on the OK button on the Add/Remove Snap-in window
Microsoft IIS 7.0
- From the Web server, click Start
- In the Search programs and files field, type mmc
- From the Programs list, click exe
- At the permission prompt, click Yes
- From the Microsoft Management Console (MMC), click File > Add/Remove Snap-in
- From the list of snap-ins, select Certificates
- Click Add
- Select Computer account
- Click Next
- Select Local computer (the computer this console is running on)
- Click Finish
- In the Add/Remove Snap-in window, click OK
- Save these console settings for future use
Step 3: Install the GeoTrust Intermediate CA
- Open the Microsoft Management Console(MMC)
- Click on Certificates from the left pane
- Double-click on Intermediate Certification Authoritiesfrom the right pane
- Right-click on Certificates from the right pane and select All Tasks > Import to open the Certificate Import Wizard
- Click Next
- Specify the location of theGeoTrust Intermediate CA file obtained from Step 1 by clicking Browse
- Click Next
- By default, it will place the certificate in the Intermediate Certification Authorities store. Keep this selection and click on the Next
- Click Finish
- A message will appear confirming the successful import of the certificate. Click OK
- Keep the Console open
Step 4: Install the GeoTrust Cross Root CA Certificate
- Using the same Console, double-click on Intermediate Certification Authorities from the right pane
- Right-click on Certificates from the right pane and select All Tasks > Import to open the Certificate Import Wizard
- Click Next
- Specify the location of the GeoTrust Cross Root CA file obtained from Step 1 by clicking Browse
- Click Next
- By default, it will place the certificate in the Intermediate Certification Authorities store. Keep this selection and click on the Next
- Click Finish
- A message will appear confirming the successful import of the certificate. Click OK
- Keep the Console open
Step 5: Check for and Disable the GeoTrust self signed Root CA
- Using the open Console, expand the Trusted Root Certification Authoritiesfolder on the left and select the Certificates sub-folder.
- Locate the following certificate:
Issued to: GeoTrust Global CA
Issued by: GeoTrust Global CA
Valid from: 5/20/2002 to 5/20/2022
Serial number: 02 34 56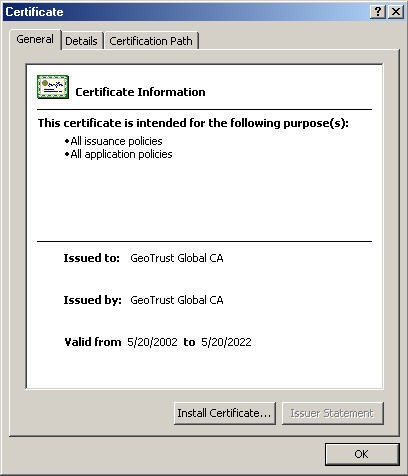
3. If this certificate is present, it must be disabled. Right click the certificate, select Properties.
4. In the Certificate purposes section, select Disable all purposes for this certificate, then click OK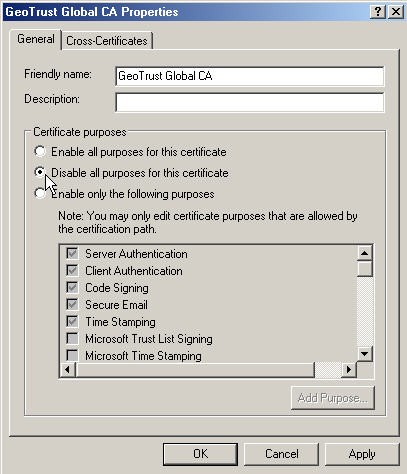
5. Close MMC - there is no need to save console settings.
6. Once this is done restart your IIS service and the error message should be resolved when you access your website.
Note:In some cases the changes may not take place after restarting IIS Services and a re-boot is needed.
Step 6: Verify certificate installation
- Stop and start your Web server prior to any testing
Note:In some cases the changes may not take place after restarting IIS Services and a re-boot is needed.
Note: There are times when even if the intermediate certificates are installed correctly and in the correctly certificates store, yet the Microsoft IIS Servers still are not sending the correct chaining across to the client. If so, export the certificate from the MMC, personal store as a .pfx file. Choose to "include all certificates in the certification path" during the export. then reimport the .pfx file back into the personal store. Make sure to assign the certificate to the website in IIS again after the import. This would link all the required intermediates and root certificate and allow the server to send the correct chain.
